Sunday, April 12, 2009
Happy Easter/Sunday or Spring!
We've had a lovely day with an egg hunt at our house for my kids and their little friends. And then a brunch/lunch for everyone. Lots of work, but good fun. This evening we had roast lamb for a special treat! Lamb is so expensive in Florida (maybe everywhere?!) but it's our fav meat, so we treat ourselves for special occasions. Put the kids to bed early because they were so tired from the excitement of the day... which has the benefit of more time free now for minis!!!
I realize it's been a while since I posted photos of the the McK's progress. It's really coming along now. Just got the attic to finish decorating now - I've done the floors, but still lots more to do.
This is the kitchen. I used craft Skinny Sticks for the wall paneling, and then molding with a skinny stick for the 'shelf' around the top of the paneling. I'm not sure if the wallpaper is the exact right color to match the table cloth, but it's close enough for now - I can always make a new table if I find more fabric. I've made a pleated skirt to go around the window seat. I still need to make a cushion of the seat and little throw cushions - I might do those tonight. And, of course, window treatments! (Opps, ignore the tub of spackle in the room above in the photo - I forgot to crop it.)
And I nearly forgot to show you a close up of my pride and joy (errr... after my kids!). My Reutter's sink! I just love it! It's the whole reason I did the kitchen in blue colors!
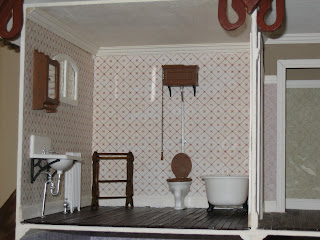
And this is the bathroom. Pretty plain looking, so I still need to jazz it up a bit. I'm thinking a 3 paneled privacy screen in the back corner for the lady of the house to change behind! The bathroom set is the Chrysbon plastic set - with acrylic paint to make it look less like plastic.
This is the living room. I changed my mind about the chairs, so now I have 1 arm chair and 1 sofa - I still might change my mind back to just 2 arm chairs. But for now this is how it will stay. They are both House of Miniatures kits that I got from eBay. I also finally got the window treatments up in the living room.
I've been making quite a few 'little' things for the dh as well - the umbrella stand in the living room, the side table/counter in the kitchen, the potted plant on the coffee table of the living room... I'm sure there's more I just can't think of them right now!
Wednesday, April 1, 2009
Pygmy Palm Tutorial
Pam (PCakes) on the Greenleaf forum has taken a look at my blog and loves my Pygmy Palm. She asked if I would tell everyone how it was made. She is also from Florida and would like to add some Floridian touches to her dollhouse... palm tree seems perfect to me!
Well I made it at a workshop, so I haven't got the supplies at home to make another one with step-by-step photo instruction - sorry. But I'll do my best to describe how we made it. It really was quite simple once you got the hang of it.
We started with foxtail grass seed heads (see photo). The teacher says she just collects from from the side of the road.
Select 7 to 11 fronds (7 for a smaller palm, 11 for a larger one). If you're doing a larger palm, select larger seed heads, for a small palm, smaller seed heads.
Gather the stems together and wrap the very bottom of the seed head with floral tape (keep the stalks on the heads - these will become the trunk of the palm). Spray the seed heads with green spray paint - I believed we used 'Basil' color ('Olive' was used later for highlighting).
Cut a piece of wire the length you would like the trunk to be. Wrap the stalks and the wire using BROWN floral tape (or green, and then painted brown). Keep the trunk as thin as possible.
Create a 'bulge' under the fronds by wrapping more tape using a figure of 8 patten around the stems. Keep it small and smooth.
Cover trunk with Fast-Grab Tacky glue and coat with ground pepper corns.
Cover the bulge with Fast-Grab tacky glue and coat with 'fluffy' textured mix. We used a mix of seed pods and other natrual matter. Just needs to be a bit more coarse than the ground pepper corns. Trim off any 'fluff' that sticks out too much.
Use a curling tong (plugged in and hot!) to bend the fronds. You probably won't want to use the tongs on your hair after you've done this!!! The tongs will flatten out the fronds and give them the distictive palm leave curl. Use different size curling tongs if you have them so the fronds are different.
Spritz the palm fronds (being careful to cover the trunk) with Olive green spray paint to add depth.
Now either plant in a pot for a 'Palor Palm' or into a straight into your landscpaing. We used pots and I put ground tea leaves as the 'soil'. Other people used lentils of different colors to look like tiny stones on the top of the pot - very affective.
People that don't live in the tropics are normally surprised to find out there are so many different types of palm tree! Pygmy palms are particularly small - normally no more than 4 or 5 feet tall. They normally grown in groups of 2 or 3 trees. they bend out slightly from each other at the base, but share the same root ball. The lower part of their trunks from thinner and slightly smoother, they bulge out just below the fronds and are quite rough there.
Hope this helps! Sorry for the lack of photos!
Subscribe to:
Posts (Atom)