Sunday, April 12, 2009
Happy Easter/Sunday or Spring!
We've had a lovely day with an egg hunt at our house for my kids and their little friends. And then a brunch/lunch for everyone. Lots of work, but good fun. This evening we had roast lamb for a special treat! Lamb is so expensive in Florida (maybe everywhere?!) but it's our fav meat, so we treat ourselves for special occasions. Put the kids to bed early because they were so tired from the excitement of the day... which has the benefit of more time free now for minis!!!
I realize it's been a while since I posted photos of the the McK's progress. It's really coming along now. Just got the attic to finish decorating now - I've done the floors, but still lots more to do.
This is the kitchen. I used craft Skinny Sticks for the wall paneling, and then molding with a skinny stick for the 'shelf' around the top of the paneling. I'm not sure if the wallpaper is the exact right color to match the table cloth, but it's close enough for now - I can always make a new table if I find more fabric. I've made a pleated skirt to go around the window seat. I still need to make a cushion of the seat and little throw cushions - I might do those tonight. And, of course, window treatments! (Opps, ignore the tub of spackle in the room above in the photo - I forgot to crop it.)
And I nearly forgot to show you a close up of my pride and joy (errr... after my kids!). My Reutter's sink! I just love it! It's the whole reason I did the kitchen in blue colors!
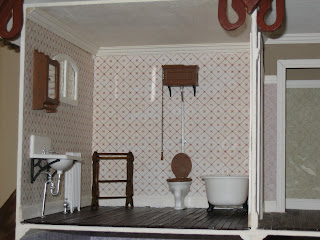
And this is the bathroom. Pretty plain looking, so I still need to jazz it up a bit. I'm thinking a 3 paneled privacy screen in the back corner for the lady of the house to change behind! The bathroom set is the Chrysbon plastic set - with acrylic paint to make it look less like plastic.
This is the living room. I changed my mind about the chairs, so now I have 1 arm chair and 1 sofa - I still might change my mind back to just 2 arm chairs. But for now this is how it will stay. They are both House of Miniatures kits that I got from eBay. I also finally got the window treatments up in the living room.
I've been making quite a few 'little' things for the dh as well - the umbrella stand in the living room, the side table/counter in the kitchen, the potted plant on the coffee table of the living room... I'm sure there's more I just can't think of them right now!
Wednesday, April 1, 2009
Pygmy Palm Tutorial
Pam (PCakes) on the Greenleaf forum has taken a look at my blog and loves my Pygmy Palm. She asked if I would tell everyone how it was made. She is also from Florida and would like to add some Floridian touches to her dollhouse... palm tree seems perfect to me!
Well I made it at a workshop, so I haven't got the supplies at home to make another one with step-by-step photo instruction - sorry. But I'll do my best to describe how we made it. It really was quite simple once you got the hang of it.
We started with foxtail grass seed heads (see photo). The teacher says she just collects from from the side of the road.
Select 7 to 11 fronds (7 for a smaller palm, 11 for a larger one). If you're doing a larger palm, select larger seed heads, for a small palm, smaller seed heads.
Gather the stems together and wrap the very bottom of the seed head with floral tape (keep the stalks on the heads - these will become the trunk of the palm). Spray the seed heads with green spray paint - I believed we used 'Basil' color ('Olive' was used later for highlighting).
Cut a piece of wire the length you would like the trunk to be. Wrap the stalks and the wire using BROWN floral tape (or green, and then painted brown). Keep the trunk as thin as possible.
Create a 'bulge' under the fronds by wrapping more tape using a figure of 8 patten around the stems. Keep it small and smooth.
Cover trunk with Fast-Grab Tacky glue and coat with ground pepper corns.
Cover the bulge with Fast-Grab tacky glue and coat with 'fluffy' textured mix. We used a mix of seed pods and other natrual matter. Just needs to be a bit more coarse than the ground pepper corns. Trim off any 'fluff' that sticks out too much.
Use a curling tong (plugged in and hot!) to bend the fronds. You probably won't want to use the tongs on your hair after you've done this!!! The tongs will flatten out the fronds and give them the distictive palm leave curl. Use different size curling tongs if you have them so the fronds are different.
Spritz the palm fronds (being careful to cover the trunk) with Olive green spray paint to add depth.
Now either plant in a pot for a 'Palor Palm' or into a straight into your landscpaing. We used pots and I put ground tea leaves as the 'soil'. Other people used lentils of different colors to look like tiny stones on the top of the pot - very affective.
People that don't live in the tropics are normally surprised to find out there are so many different types of palm tree! Pygmy palms are particularly small - normally no more than 4 or 5 feet tall. They normally grown in groups of 2 or 3 trees. they bend out slightly from each other at the base, but share the same root ball. The lower part of their trunks from thinner and slightly smoother, they bulge out just below the fronds and are quite rough there.
Hope this helps! Sorry for the lack of photos!
Monday, March 23, 2009
Welcome Sylvia
Thanks for joining us Sylvia. She has a great blog with lots of wonderful photos... unfortunately I can't understand the writing. But the pictures are amazing! I love her 'dirty' roombox (the photo on the title of her blog, more photos in her blog). It looks so lifelike!
Now I promise that I have been doing mini work! Just nothing too inspiring at the moment. The kitchen is nearly finished (photos of that soon I promise). I've been in an 'anyhow' mood lately. I just can't seem to commit to one particular thing! Today I made another House of Miniatures chair to match the one I made a few weeks ago, and worked on a fabric skirt to go around a window seat in the kitchen of the McK. After that I did a bit of work on window frames, but that was pretty much it. I did take the top and bottom apart of a Michael's $1 hutch - I wanted to use the bottom part as a counter in the kitchen. But it just doesn't look right - too cheap looking, so either I've got to work on it more (hhmmm) or toss it!
Just 'busy' work, not really accompishing anything. Hopefully tomorrow I'll feel more motivated.
Thursday, March 19, 2009
Nothing new...
Nothing new to report I'm afraid. I'm busy plugging away at the McKinley. I've got the wood floors done in the kitchen and bathroom now (everywhere is done now except the attic). Working on the walls in the kitchen. It took me a few days to decide what to do - I'm doing wood panels on the lower half and wallpaper above. Not much to show right now, so I'll post pix when I'm finished!
Here's some pictures of a refurb I bought off Craigslist for $25 (including furniture). I'm not sure if it was a good deal, but it's cheaper than a new kit!! There's a lot of work to do on it, new exterior trim, windows, roof, everything inside....!! I bought it a good few months ago, but I don't want to start on it until the McK is further along - I'm not good at multitasking (yes... I know, and me with 2 little kids!).
It's a Greenleaf Country House. I think I'm going to do it as an English pub. I've already got a bar and some benches for it. I'm probably going to thatch the roof - I've got some coconut matting for that. Lots of ideas, so I can't wait to start on it!!! But I'm being good and resisting...!!
Also... I hope everyone has seen that Greenleaf has annouced their Spring Fling contest model. It's very unusual! Not sure if I'm going to get one, it will depend on the price (hoepfully find that out tomorrow). Anyway go to www.dollhouse-kits.com for more info.
Saturday, March 14, 2009
Sisterhood Award
Well thank you to Casey, Doreen, MiniKat and Brenda for my award!!! This one seems to be flying around at the moment! It seems like everyone that I admire already has this award. I can't go through my whole blog list right now, so this is just dedicated to everyone that hasn't got it already! (Cop out I know!).
Welcome Jean & Minna
A big welcome to 2 new followers - Jean and Minna
I'm a huge fan for Jean Day's work! I'm so pleased she has found my blog! She has a wonderful website (Jean Day) and a blog and also has lots of free printies - here!!!
And welcome Minna, she has a great blog with lots of photos of her work - love the doilies! Minna
Sunday, March 8, 2009
Wonderful Day
I had such a wonderful day yesterday.
Firstly it was Saturday so that means my husband gets up with the children and I get to stay in bed for an extra hour or 2 (heaven!). But I didn't stay in bed for long as I had my first... MINI WORKSHOP to go to!!!!!!!!!!!!!
We made these adorable Pygmy Palms (or Parlor Palms). I'm going to put my one in the bay window in the living room of the McKinley.
The teacher, Marilyn (sorry, don't know her last name, but she's from South Florida and does trees and palms), was wonderful. She gave us so much help and sooo many ideas! The palms are made from weeds... yes, dried up foxtail seed heads! The trunk of the palm is coated with ground pepper! How she thought these up I've no idea!
We had the workshop at the club house of one of our members. Her community is RIGHT across the street from Edison Mall!! So while we were waiting for the glue to dry we all went to the mall for an hour and a half. Now this was a real treat for me! I NEVER go to the mall, and never on my own! I even went to my favorite store - Lush - that sells handmade cosmetics and bath smellies. Then back to the club house to finish the palm.
We finished by about 1.30pm, I didn't want to go home at that point as that is nap time and I didn't want to wake the kids up opening the doors etc. So I went to Joanns for a little while. Didn't get much, just some wood circles, wire etc. But again it was such a treat to walk around all on my own and look at everything! I got lots of new ideas!!!
After that I STILL didn't feel like going home, so I went to the library for a bit. And once again, this was a real treat - we go to the library pretty much every week, but I never get to look at the grown-up books! I got 2 books on minis and 1 about making miniature fleece dogs... out of real dog hair!!! Not sure if I'm going to try it, but it's fun to look through. Oh and I got Margaret Grace's first book - 'Murder in Miniature'. I need a new 'bedtime' book, so hopefully this will be worth the read.
When I got home hubby and the kids were out, the house was a bit messy, but it could have been worse (and normally is!). By the time I had finished tidying up they got home... with presents for me!!! A BEAUTIFUL orchid (my other passion) that hubby and Jack had picked out for me, and (drum roll please).... lamb chops for dinner!!! This might seem a very odd presents, but I LOVE lamb! But it's just too expensive for us to have it, we maybe have it twice a year! So we got the kids to bed and had a wonderful meal. A perfect end to a perfect day!
PS. Jack, my 3 year old, was very sweet and kept asking me if I liked my presents because it was from him and Daddy. He was so proud that he had got me a present!
Another award
Thank you so much to Doreen from Doreen's Miniatures.
This is a tricky award as you have to pass it onto 15 people. It really is an honor to receive it, but I've decided not to pass it on. All the bloggers I love have already got this award, and pretty soon we'll run out of time for blogging or mini-ing, as we'll have to spend all our time sending awards to each other!!!
If you want to see who I really admire go to 'My Favorite Blogs' list on the right to see all them all!
3 new friends have joined us. So welcome to:
Karin F, she has a mini blog - Mini Ramblings and More - is is currently turning the Greenleaf Orchid kit into a Sewing Emporium! Lots of fun!
Minikat - she also has a great miniature blog - Little Thoughts from An Average Mind. Some great idea candy on her site - I love her little cakes!
And lastly Liberty Biberty. A great mini blog - Liberty Biberty - she has made some very cute things!!! And I agree with her about children! They all seem well behaved until 5pm when you are trying to cook dinner!!!
Wednesday, March 4, 2009
An Award!!!
Oh... I've won an award for my blog! How very exciting! It was from MiniMaker who has a great blog with videos of miniatures - eye candy and tutorials! I just love her blog!!!!
The rules state that I must list 5 things that I'm addicted to, and pass the award along to 5 blogs I admire, and they must do the same.
So 5 things I'm addicted to....:
1. Well, of course, miniatures!!!! Goes without saying (but I said it...).
2. The internet (I should really be in bed by now!)
3. My kids (I have to say that don't I!!)
4. Saving Money - my other passion is coupons, and hunting out sales!
5. My dogs! I just love them to pieces!
My fav 5 blogs... that is really hard! Most of the blogs i love have already got this award, so I know they will hate me for sending it to them again!!! But I'm going to just this once... sorry!!!!
1. Casey's Minis - I have to have my daily dose (I'm addicted!)!!!
2. Tiny Treasures
3. Nikki's Witch and Wizard Miniatures
4. Fluffy Bricks
5. Doreen's Miniature Projects
I could go on and on... as I love all the mini blogs I follow!
Tuesday, March 3, 2009
An idea...
I'm getting a great response to my bobbin lace pillow (see a couple of posts down - Pillow Talk) that I posted pictures of on Greenleaf's miniature's forum (Greenleaf). So now I'm getting the idea that I really do want to start making them to sell. Seems like there is a small (pardon the pun!) market for them.
Now where do I get more fancy toothpicks from? I... errr... 'liberated' the ones I used for this pillow from a restaurant. I guess I should buy my own!!!!
Oh and I realized that I never posted this photo. It's a picture of my daughter, Annie, on her 1st birthday with the box for the McKinley (her birthday present!). And yes, she is crying in the photo. I don't think she was very impressed!!!!
Mini Friends
Last night I went to the meeting of the local miniatures club. It's only the second meeting I've been to, but already I love going! It's a great bunch of ladies (I am the youngest, but I don't care!), and we have a great time! Last night we made mini African Violets in a pots. My first go at making plants, and I really enjoyed it! (Yes, I need to clean the glue off the edges of the pot!)
Also I was lucky enough to win the door prize. I got a wonderful little dinner - sliced ham, asparagus and mashed potatoes... all in miniature of course! Good enough to make your mouth water! The only down side to winning, is that I have to provide the door prize for next week - not sure what I'll take. I haven't been doing minis long enough to have a 'stash' to dig through. So I'm going to have to make something - gulp! anyone got any suggestions for something easy but impressive I can make???!! HELP!!!!!
Some new followers have joined us. So welcome and come on in to:
Pussman who has 2 blogs - Pussmanstuffies and Pussman & Co
Taenia who has a mini blog - Taenias Miniatures - lots of great tutorials!
Pillow Talk
I finally got my mother's miniature bobbin lace pillow finished!!! It's the first project I've made from scratch with no instructions or tutorial to follow - so it is ALL my own work! Have to say I'm pretty pleased with myself!!!!
If you're not familiar with what bobbin lace pillows look like (most people aren't!), then take a look at this site - Beginners Guide to Lacemaking. Lace pillows are generally blue (like on this website) or green like the one I've made. My mom prefers green ones, so that's what she got!! The number of bobbins on a pillow is determined by the complexity of the pattern. The little piece of lace on my mini pillow is pretty basic, so doesn't need very many bobbins.
This is a photo of it in my dollhouse (next to my HOM chair, that I finally finished off with trim). The bobbins are made from the tops of fancy cocktail sticks, the pillow is a wooden disk, with padding on top covered in fabric. The cover cloth (the one that hangs down the front slightly) was soaked in a water/glue mixture then held in place, so it has a more natural looking hang to the fabric (not the 'flying in the wind look). I made the wooden stand out of a stair case spindle and carved the little feet myself.
My mom is really pleased with it and can't wait to take it home to show all her friends. She returns to England tomorrow (after 5 weeks here), so I got it finished just in time!!! We're going to miss her!
My mom is also trying to convince me to make mini lace pillows to sell. I really don't know if there is much of a market for them - lace isn't particularly popular right now. However for a house to be truly Victorian it would have a lace pillow somewhere in the house! We did actually see some for sale at Ron's Miniature's in Orlando, but they were $140!!!! that's what gave me the idea to make one!!!
Thursday, February 26, 2009
They arrived!!!
My microbeads and trim arrived today (for different companies).
I'm so pleased - tonight I'll finish the lace pillow and hopefully the chair as well.
Both were shipped so quickly.
The beads were from:
www.minikitz.com
And the lace and trim was from:
www.miniatureluxuries.com
Hope to have photos to share with you all later (or tomorrow).
I'm so pleased - tonight I'll finish the lace pillow and hopefully the chair as well.
Both were shipped so quickly.
The beads were from:
www.minikitz.com
And the lace and trim was from:
www.miniatureluxuries.com
Hope to have photos to share with you all later (or tomorrow).
Welcome new followers... I think
Well I think pretty much every blog is complaining about the changes to the followers lists that Blogger has made. So I have 2 new followers but I can't really figure out how to link them! Sorry. so I'll give it a go!
So welcome:
Karen Clark of Crystal Velvet Weddings. It looks like she has 3 blogs (or 3 links). This seems like her main one - please check it out.
And welcome Mary. She is new to miniatures and has just started a blog. Welcome to the world of mini blogs!! Here it is - Widdle Hinges.
So welcome:
Karen Clark of Crystal Velvet Weddings. It looks like she has 3 blogs (or 3 links). This seems like her main one - please check it out.
And welcome Mary. She is new to miniatures and has just started a blog. Welcome to the world of mini blogs!! Here it is - Widdle Hinges.
Wednesday, February 25, 2009
Welcome De
I'd like to welcome De to our little (but growing!) party!
Thanks for following. De has a great blog here - De~lightful Minis.
Photos at last!
I did manage to get some photos done tonight - that's about all I did though! Hubby had a good day (lots of important stuff done!) so he wanted to go out to dinner to celebrate. As my mom is staying with us (she goes home to England in a week), we thought we would take advantage of the built-in babysitter!!! So no mini-ing tonight!
Oh and yes, that time of my post is correct! It's nearly 3am! I always do this, eat too much and have too much red wine and then I can't sleep! I'm not one of these people that can survive on a few hours sleep either, less than 8 hours and I'm a mess! Tomorrow (or should that be 'today'?) is going to be a LONG day!
Anyway, on to what you really want to see! The photos of what I've been doing!
Here's the table cloth. I used a laundry detergent lid as the base and covered it with 2 fabrics - 1 from a thrift store (the solid blue) and the other from Joanns. The trim is some picot that I got from a miniatures store (Ron's in Orlando). I followed the tutorial from Casey's Blog (Here) and I have to say it was EASY! So I'll definitely be making more of those! I just need to think of things to go ON the tables now! This one is going to end up in the kitchen of the McKinley, just got yo decorate the rest of the room now. But at least I've got a color pallet now!
Here's the chair. I've ordered some antique gold braiding to go around the seams. I made a bit of a mess of them! But for a first attempt I'm pretty pleased with it. Not as messy as I thought it would be! As I mentioned before I've got an incomplete kit for the matching sofa and another chair. Not sure if there will be space for the sofa (the Mckinley's rooms aren't very deep), so I think I'll just do the chair. Need to look at the kit in more detail to see what I'm missing - maybe I can use parts from the other kit to complete it. Otherwise I'll just get another one from eBay!
I didn't get the drapes hung tonight, so no photos of those. and I want to do a bit more work on the lace pillow before I share photos!
Right I'm off to bed! Hopefully I'll sleep. Wish me luck for the day! I'm in the process of potty training my son, sleep deprived and potty training just don't go together!
Oh and yes, that time of my post is correct! It's nearly 3am! I always do this, eat too much and have too much red wine and then I can't sleep! I'm not one of these people that can survive on a few hours sleep either, less than 8 hours and I'm a mess! Tomorrow (or should that be 'today'?) is going to be a LONG day!
Anyway, on to what you really want to see! The photos of what I've been doing!
Here's the table cloth. I used a laundry detergent lid as the base and covered it with 2 fabrics - 1 from a thrift store (the solid blue) and the other from Joanns. The trim is some picot that I got from a miniatures store (Ron's in Orlando). I followed the tutorial from Casey's Blog (Here) and I have to say it was EASY! So I'll definitely be making more of those! I just need to think of things to go ON the tables now! This one is going to end up in the kitchen of the McKinley, just got yo decorate the rest of the room now. But at least I've got a color pallet now!
Here's the chair. I've ordered some antique gold braiding to go around the seams. I made a bit of a mess of them! But for a first attempt I'm pretty pleased with it. Not as messy as I thought it would be! As I mentioned before I've got an incomplete kit for the matching sofa and another chair. Not sure if there will be space for the sofa (the Mckinley's rooms aren't very deep), so I think I'll just do the chair. Need to look at the kit in more detail to see what I'm missing - maybe I can use parts from the other kit to complete it. Otherwise I'll just get another one from eBay!
I didn't get the drapes hung tonight, so no photos of those. and I want to do a bit more work on the lace pillow before I share photos!
Right I'm off to bed! Hopefully I'll sleep. Wish me luck for the day! I'm in the process of potty training my son, sleep deprived and potty training just don't go together!
Tuesday, February 24, 2009
Lots more people...
Lots more people following my blog! So thank you and welcome to:
Brenda and you can see her mini blog here: Brenda's Miniatures
Daisy, who has 5 mini blogs - you can see them here
Suzeeez who has just started a blog. Looking forward to seeing what you post (Here).
And Sandy, who has a some absolutely beautiful (full size) jewelry on her blog.
I promise I will post more pictures of what I've been working on soon. I've actually be making quite a few things! I've made good progress on the bobbin lace pillow for my mom - it's nearly finished now. Just waiting for some microbeads to be delivered (any day now!) so I can finish the bobbins! I have to say it was my first piece that I've built from scratch with no tutorial to follow, and I'm really pleased with how it's come out.
Also I've put together one of that House of Miniature Chippendale armchairs. I've got a sofa and another armchair still to do, but I've just discovered they have parts missing! So now I'm not sure if I should just scrap them and buy more (eBay here I come!) or try and make the missing parts.
And lastly, last night I worked on the drapes for the living room. They look really good! I'm so pleased with them! I'll put them up tonight and get some photos.
Oh and I also made one of those skirted table cloth tables the other day. Again very pleased with myself! So lots to photograph for you all to look at! I promise I'll get to it tonight! The kids are napping now, so I have to get on with some real-life work! No rest for the wicked!
Friday, February 20, 2009
Welcome Debbie
And another welcome is in order. This time to Debbie. She has 4 blogs in total - 3 about miniatures and one about her beautiful Shetland Ponies! Check her out here: Debbie
I'm also very jealous of her links page! It just goes on and on... and so well organized! One of these days I'm going to do something similar for all my bookmarks. One of these days.......!!!!
Thursday, February 19, 2009
My progress
I'm making pretty good progress on my McKinley (I've really got to come up with a better name!).
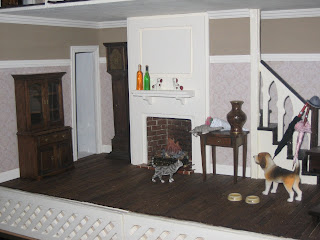
The living room is virtually decorated now - floors, wallpaper and molding are done. Just needs curtains and then a LOT more furniture!
The 2 cats names are Albert and Victoria. Victoria is the cat on the floor, and Albert (always in trouble) is on the table. I just hope Victoria doesn't decide to join him and knock the roses off the table! And their long suffering doggy friend hasn't got a name yet!
The bedroom is looking pretty good, still more work to do on the molding though - I need to finished the chair rail. Then, of course, the bed needs dressing and the windows need curtains. Do you notice a theme here? All the fabric projects still to do! I love fabrics, and I have a pretty good stash, but I can never find that 'perfect' piece!
And here's a final picture of the whole house. As you can see - still a lot of work to do! I am pretty slow my most people's standards I guess. I only get an hour or 2 each evening to work on minis. And then I have to pack everything up after I've finished and lock it away in a child-proof cabinet!!! A bit of a pain, but I really don't need my 3 year old 'helping' me!!!
Right off to do mini-ing. Tonight actually I'm working on making a bobbin lace-making pillow and stand. My mom is a bobbin lace maker and saw a mini pillow and stand that she fell in love with at Ron's Miniature's in Orlando, but it was $140. So I thought I could try and make her one! We'll see how it goes... !!!
Thanks for Following...
So I've only got 1 post and already people are following my Blog! Thank you for joining me... now I really feel so pressure to write something interesting!
So welcome to:
MiniMaker who has a wonderful blog with lots of 'how to' videos - MiniMaker
Doreen who has 2 interesting mini blogs - Doreen's Miniatures & Doreen's Mini Projects
Tallulah-Belle who is also new to blogs, but has made some beautiful mini plants - Tallulah-Belle
Monday, February 16, 2009
And so it begins...
I feel bad that I read so many other people's blogs but don't have one of my own! So I'm going to start one! I'm not going to post everyday, life is just too busy for that. But I hope to keep you up to date with my mini progress and maybe share a few tips I learn along the way.
I'm pretty new to miniatures, but the addiction hits hard and fast!!! I'm currently working on a Greenleaf McKinley for my daughter (well... I say it's for her, but she's only 1 year old!) and I've got a Greenleaf Country House rehab to get to one day... As well as plenty of other ideas for room boxes etc. I just wish I had more time. My 3 year old son, Jack, my 1 year old daughter, Annabelle (Annie), my husband and my 2 dogs - Strider and Josie - keep me pretty busy most of the time!
So here's a bunch of roses I made to officially welcome you to my blog! Cheers!
Subscribe to:
Posts (Atom)